As one of the most popular Content Management Systems (CMS), Wordpress is frequently attacked to try and exploit vulnerabilities in outdated installations, as well as simply to try to gain access to the admin area to add posts to or deface sites. We've covered securing WordPress in one of our
previous posts, however this one specifically aims to help you protect against brute force login attempts. Such attacks are conducted by bot nets (thousands of computers are involved), and they attempt to break into the administration area by brute force (trying thousands of username/password combinations). On the 6th March 2014,
WordFence (a popular security plugin provider for WordPress) made the following
announcement:
We're seeing an unusually large WordPress attack underway. Our automated alert system triggered and posted to FB and Twitter earlier today. The attack is visible on http://www.wordfence.com/ and as you can see it is peaking at 40,000 attacks per minute currently. Normal attack frequency is around 2000 attacks per minute.
The attack started at 7:30 AM Pacific Time this morning. It is still underway. The nature of the attack is a large botnet that is generating a huge number of failed WordPress login attempts.
The aim of this post is to teach you how to protect your WordPress installation(s) from these attacks.
[box style="light-yellow highlight shadow" ]For this solution to be successful, you must also follow
all five steps below. If you require assistance with any of these, please contact our technical team for assistance via our
client portal.
- For security and for the following steps to be successful, it's essential that you ensure your WordPress is completely up to date - this includes the core, plugins and any theme(s).
- Now that you're running WordPress 3.8+, install the following plugin: https://wordpress.org/plugins/wps-hide-login/. You can do this quickly and easily from within your WordPress dashboard - click "Plugins" > "Add New". Once there, just type "WPS Hide Login" in the search box:
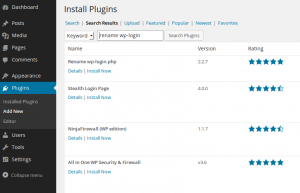 Click over "Install Now", confirm the warning message and let it process.
- Once WordPress completes the installation of the plugin, click over "Activate Plugin"
- You will be redirected to the plugins page. Click 'Settings' on the left, and then scroll to the bottom of the main WordPress settings page. Look for the option "Login url". There you will see your blog's web address and a field you need fill in order to setup your new login url. In this case, I chose "bloglogin" - we recommend choosing something unique that you will remember.
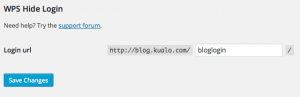 Make sure you take note of the new address. To activate it, click on "Save Changes". Simple!
- There's one extra step to take, because now every visit to the old /wp-login.php file will cause WordPress to generate a 404 page not found page. Add the following code to the top of your .htaccess file in the directory that contains your WordPress installation. This can be done via FTP, or you can do so via the File Manager in cPanel - just be sure to check the 'Show Hidden Files' option so you can see the .htaccess file.
<FilesMatch "wp-login.php">

Deny from All

ErrorDocument 403 "Forbidden"

</FilesMatch>
The above code will block all requests to the wp-login.php file, as no legitimate requests should be made to that file now that the WordPress address has been changed. This will protect your account by both preventing login attacks against your WordPress installation(s), and reducing the volume of PHP executions being processed.
If you're not familiar with editing the .htaccess file, here is how to do this via File Manager in cPanel:
1. Log into your cPanel account.
2. Click on the File Manager icon.
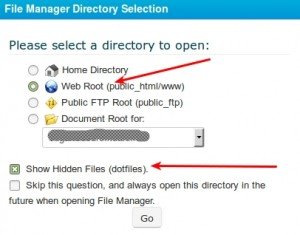
3. On the screen should pop up a small window, select the 'Web Root' directory, and make sure the 'Show Hidden Files' option is checked and click the 'Go' button.
4. With File Manager open, navigate to the folder where you have WordPress installed. If this is installed on your main domain, you're already there.
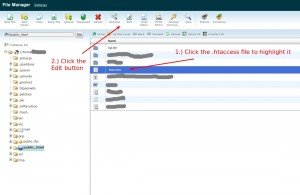
5. Click the .htaccess file. To highlight it, and select the 'Edit' button. Then click the 'edit' button again on the window that pops up.
6. Add the code mentioned above to the top of the file and click the save button.

We hope that you found this tutorial useful and as always if you require any assistance feel free to contact us by raising a ticket via our
client portal and one of our engineers will be happy to assist you!